Thursday, December 18, 2014
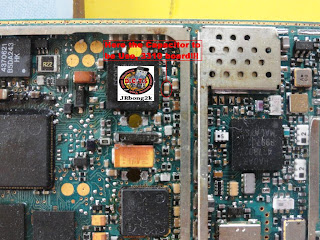
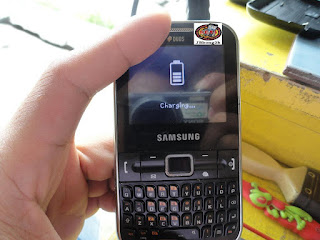
GT C3222 DUOS Wet Phone Charging Problem Done

This is featured post 1 title Replace these every slider sentences with your featured post descriptions GT C3222 DUOS Wet Phone Charging Problem Done
Nokia C2 06 Full PCB cellphone Diagram Mother Board Layout Here is the cellphone diagram of Nokia C2 06 PCB so i will add some more cellphone diagram in high resolution so that you can add some more repairing trick for
Nokia C2-06 Full PCB cellphone Diagram Mother Board Layout.
Here is the cellphone diagram of Nokia C2-06 PCB.so i will add some more cellphone diagram in high resolution so that you can add some more repairing trick for
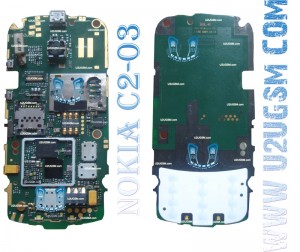
Nokia C2-06 if you find some new repairing techniques please must email me and i will post that diagram with your reference in this way we all make it possible “REPAIRING MADE EASY” the basic point of www.u2ugsm.com
Thanks
for more detail and new tips and tricks about cellphone service problem keep visiting this page we will update cellphone service diagrams timely with other mobile solution.some related post are also given bellow you can read them also for more information about cellphone.
Here is the cellphone diagram of Nokia C2-06 PCB.so i will add some more cellphone diagram in high resolution so that you can add some more repairing trick for
High Resolution
Thanks
for more detail and new tips and tricks about cellphone service problem keep visiting this page we will update cellphone service diagrams timely with other mobile solution.some related post are also given bellow you can read them also for more information about cellphone.
Thursday, December 11, 2014
How To Jailbreak Your iPad on iOS 5 1 1 Using Absinthe 2 0 – Windows

[Tutorial] How To Jailbreak Your iPad on iOS 5.1.1 Using Absinthe 2.0 – Windows :::
NOTE: Before you continue to follow below steps make sure that you do a backup of your device in
iTunes cause, during this process you may lose your Camera Roll and other data.
Step 1: Use this link to download latest Absinthe version.
Step 2: Extract the downloaded content inside new folder on your desktop.
Step 3: In the folder that we just extracted, find and click on absinthe-win-2.0.exe file.
Step 4: New folder called absinthe-win-2.0 will be automatically created.
Step 5: Open the folder that was just created and launch absinthe.exe.
Step 6: As suggested in pop-up window, connect your iPad to your PC using USB cable, and make sure to remove VPN settings or any passcodes you set before.
Step 7: To begin click the Jailbreak button.
Step 8: This application will need to perform several steps for jailbreak to be completed. Those steps are: beginning jailbreak, sending initial jailbreak data, sending final jailbreak data, waiting for reboot, and waiting for process to complete.
Step 9: When the process is finished you will be informed that jailbreak is successfully finished.
Step 10: Cydia will appear on your iPad Springboard in a few moments.
Step 9: When the process is finished you will be informed that jailbreak is successfully finished.
Step 10: Cydia will appear on your iPad Springboard in a few moments.
Sunday, December 7, 2014

All China Mobile Dual Sim IC Ways And Jumper Ways

All China Mobile Dual Sim IC Ways And Jumper Ways
Monday, November 24, 2014
Analysis of Short Flows in Nokia BB5
 This analysis is applied to Nokia BB5 mobile phones that use RF (AHNE), using the processor RAPGSM v1.1, not RAP3G.
RAPGSM v1.1 is included in the CMOS processor (MOSFET) which is a series combination of Field Effect Transistor (FET), Vdd (drain) as a positive voltage, Vss (source) as a negative.
RAPGSM need two types of voltage, namely :
RAPGSM need two types of voltage, namely :
- Microprocessor Voltage, Vcore = 1,4 V
- Data Signal Processor Voltage, VIO = 1,8 V
In RAPGSM have a 19 foot VddCore obtain positive voltage 1,4 V (drain) of the TAHVO, and 19 feet VssCore negative voltage (source) to ground, and 11 feet that obtain VddIO voltage 1,8 V.
Approximately 50 feet from the input voltage (Vdd/Vss) for the RAP, the common short-circuit on its feet. Therefore, most likely caused by this RAPGSM. However, if we want to do a more precise measurement, it is very difficult if only done by injecting a voltage or a heat feeling.
Why? because in RAPGSM ICs module, on input Vdd/Vss, there is a protection diode works as switching when short. So, when RAP short, not hot. However, the heat occurs at a regulator, which is RETU or TAHVO.
Therefore, we could either make a conclusion. So, if RETU heat, it doesnt mean that experienced short RETU.
Therefore, the proper way to do an analysis is to perform elimination. Elimination is to decide the voltage on one of the suspected components, and then compare it back to the power supply.
Nokia 6610 Power Switch Problem
Phone Repairing this time again will share experiences in repairing the damage Power Switch on the Nokia 6610 mobile phone.
Symptoms of damage to the Nokia 6610 mobile phone this time are: Mobile to die, but when connected to the transformer charger, can charge mobile phone battery.
This indicates that the mobile machine is still working, but the phone can not be turned on because of any damage or problems on the power switch. The first step I did was make a visual inspection. This is done to ensure that no chip is missing either due to collision and so on. Having ascertained that no chip is lost or separated, then the next analysis was to examine whether the PCB track is broken or not. In this examination step, I do not find a damaged PCB track, but instead there is the resistance value of resistor which does not match that should be. R306 chip is as shown in the following figure:

To repair this damage, we can replace the resistor with the same value as shown in the diagram scheme. However, if we do not have a resistor, we can handle it by doing jumpers from switch on / off straight to the point of resistors that is connected to UEM IC. The picture as shown below:

Sunday, November 23, 2014

Friday, November 21, 2014
How to get rid of annoying mobile ads on your Android Phone
Sometimes when you try to download android apps from Google play app store or play downloader games like Angle Bird, they sometimes push annoying ads to your smartphone, and you find it really boring that you want to remove all the annoying ads on your android device. But how to get rid of these annoying mobile ads on Android Phone?
 Being a long android lover, I have discovered a list of good tips and powerful apps for you here. If you have the same problem, Follow the Tutorials to have a try and you will find it really useful.
1. Download free app called AirPush Detector AirPush Detector is the app that detects other installed applications to see which apps appear to use notification ad frameworks and users can easily uninstall them.
The app cant block ads, but at least it can tell you which apps are causing them. So you must uninstall the app to stop the ads.Now for the trick
2. If your phone is rooted, you can try AdFree and AdAway. Both of the apps are free.
AdFree removes most ads in the browser and other apps. It does this by nullifying requests to known host names in the system hosts file, and AdAway is a similar app like AdFree.
3. To some extent, in my eyes, the ads are there to support developer to keep Develop innovation product. If you really want to remove them, the easiest way is to use your phone offline whenever you are using the add supported app.
Read More..
1. Download free app called AirPush Detector
The app cant block ads, but at least it can tell you which apps are causing them. So you must uninstall the app to stop the ads.Now for the trick
- After youve detected and deleted the apps which push ads, head to the Google Play Store.
- Once inside the Play Store, tap on Settings.
- Inside Settings, uncheck "Google AdMob Ads”, this will make sure that you will no longer receive targeted ads from Google.
2. If your phone is rooted, you can try AdFree and AdAway. Both of the apps are free.
AdFree removes most ads in the browser and other apps. It does this by nullifying requests to known host names in the system hosts file, and AdAway is a similar app like AdFree.
3. To some extent, in my eyes, the ads are there to support developer to keep Develop innovation product. If you really want to remove them, the easiest way is to use your phone offline whenever you are using the add supported app.
Thursday, November 20, 2014


How to sync Gmail with HTC HD2
The HTC HD2 is a Windows Mobile smartphone offering a touchLcd , Bluetooth , 5 mega pixel camera , a media player, internet connectivity, tethering capabilities and social networking applications such as Twitter and Facebook . If you use Google as your primary email account , you can synchronize it with the HTC HD2 through the implementation "ActiveSync" . Once you have completed synchronization, receive your Gmail on the phone as soon as you receive the Gmail server .How to sync Gmail with HTC HD2
Read More..
- Touch the application "ActiveSync" on the main Lcd of your phone.
- Touch " Set up your device to synchronize " .
- Type " m.google.com " in the field "Server address " .
- Check the box next to " This server requires an encrypted connection ( SSL ) " .
- Login to your Gmail account by typing your user name and password. Touch " Next" . Do not enter anything under "Domain" . Touch " Next" .
- Check the box next to " Contacts " , "Email" and " Calendar " . Tap " Finish" . Tap " Sync" .
How to Share Files Between Your PC and Android Smartphone
If you have an Android smartphone, I am sure that apart from making phone calls, you will also use the phone to listen to music, play videos, takes photos or even creating a lot more documents on the go, and all your important data is very important that you must be stored on your PC. Sometimes, you have downloaded a lot of movies on the computer but want to enjoy them on your smartphone. So you have to transfer your files Between Your PC and Android Phone. There are a couple of different methods available to you for transferring files from your computer to your Android smartphone, and here I will show you how to achieve it.
 1. Using a USB cable
 The simplest way to transfer a file between your pc and phone is using a USB cable. Most phones already come with a compatible cable so you dont have to buy it. Here is the how to tutorial.
Android Sync Manager WiFi is an easy-to-use free Android sync tool thats specially designed for mobile content management of Android handsets. With this app, you can easily synchronize, manage and back up mobile contents between handset and PC, such as contacts, messages, calendar, photos, video and music files, etc.
 To start with, make sure that Android Sync Manager WiFi is installed on PC while Android Sync Manager Agent installed on the handset.Note: To use Android Sync Manager WiFi, both of your Android handset and PC must be connected to the same WiFi access point.3. Use WiFi File Explorer
WiFi File Explorer uses your Android devices Wi-Fi connection to join your wireless network, then creates a little Web server on your network that lets you browse your files from any other computer on the network. So you just go to your PC, type the IP address and port number the app gives you, such as 192.168.1.77:8000, and then youll see a list of your phones files and folders in your browser window.
 In addition to just copying files, you can stream music and video from your device. The pro version, which costs less than two bucks, adds the ability to create new directories on your phone, download multiple files from the device simultaneously, download whole directories, stream media playlists, backup your entire device, and more.4. Cloud Storage app: DropBox
The most popular cloud storage provider, Dropbox, is a free service that lets you bring all your photos, docs, and videos anywhere. After you install Dropbox on your computer, any file you save to your Dropbox will automatically save to all your computers, your Android device, and even the Dropbox website! With the Dropbox app, you can take everything that matters to you on the go.
But this kind of service is not totally free. It only allows you to 2GB of storage space, everything above that wont be synchronized with the server. There are 10GB or even 100GB packages available, but they are not for free.- Use the USB cable that came with your phone to connect the phone to a USB port on your computer.
- You receive a notification that the USB is connected.
- Open the Notifications panel and touch USB connected.
- Touch Turn on USB storage in the Lcd that opens to confirm that you want to transfer files. When the phone is connected as USB storage, the Lcd indicates that USB storage is in use and you receive a notification. Drag-and-drop the desired file(s) to the drive.
- After done, in your phone’s notification window, tap Turn off USB storage.
- Unplug your phone and you’re all set. That’s all.
Android Sync Manager WiFi is an easy-to-use free Android sync tool thats specially designed for mobile content management of Android handsets. With this app, you can easily synchronize, manage and back up mobile contents between handset and PC, such as contacts, messages, calendar, photos, video and music files, etc.
WiFi File Explorer uses your Android devices Wi-Fi connection to join your wireless network, then creates a little Web server on your network that lets you browse your files from any other computer on the network. So you just go to your PC, type the IP address and port number the app gives you, such as 192.168.1.77:8000, and then youll see a list of your phones files and folders in your browser window.
The most popular cloud storage provider, Dropbox, is a free service that lets you bring all your photos, docs, and videos anywhere. After you install Dropbox on your computer, any file you save to your Dropbox will automatically save to all your computers, your Android device, and even the Dropbox website! With the Dropbox app, you can take everything that matters to you on the go.
There are hundreds of applications capable of that in the market, just find the application that works best for you.
Nokia C3 01 White Lcd Problem Solution ic Jumper

Nokia C3-01 White Lcd Problem Solution ic Jumper

Wednesday, November 19, 2014

HTC One X How To Delete All Photos
The other thing that could make me confused in the beginning using HTC One Xt is how to remove the image in Gallery application , I do not see the Delete menu when browsing images in the Gallery app .
It turned out to erase the image can be done by opening the image one by one and press the button with trash can in the upper right corner , or if you re browsing the pictures in thumbnail form as seen in the picture above , you press a picture about 1 - 2 second up the trash button appears in the upper right corner of your Lcd , if you want to select more than one image you just hit another image and hold for a few 1-2 second up writing numbers on items selected in the top left corner increases , after the pictures you want to remove your selected all now live through his garbage just press the button to delete all the pictures .
Read More..
It turned out to erase the image can be done by opening the image one by one and press the button with trash can in the upper right corner , or if you re browsing the pictures in thumbnail form as seen in the picture above , you press a picture about 1 - 2 second up the trash button appears in the upper right corner of your Lcd , if you want to select more than one image you just hit another image and hold for a few 1-2 second up writing numbers on items selected in the top left corner increases , after the pictures you want to remove your selected all now live through his garbage just press the button to delete all the pictures .
Nokia C3 Not Charging solution charger no response problem solution
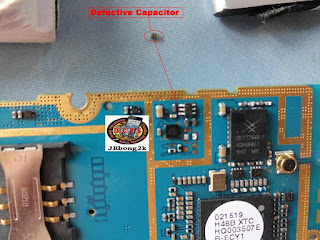
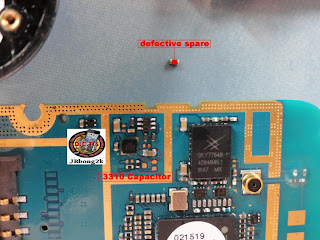
Heres the solution for Nokia C3 that does not show charging indications when the battery charger is being plug-in. This solution simply shows particular components that may need to check or replace if charging problem occurs.

The components showed on the solution above might get possibly damaged and causes the charging problem issues. Those components are made of filter coil, a diode and a resistors.
If already tried to check and replaced those certain components but the problem still exists you may need to rework the JUNO IC for further troubleshooting procedures.
Read More..
Nokia C3 Not Charging solution for charger no response problem

The components showed on the solution above might get possibly damaged and causes the charging problem issues. Those components are made of filter coil, a diode and a resistors.
If already tried to check and replaced those certain components but the problem still exists you may need to rework the JUNO IC for further troubleshooting procedures.


HTC One X How to Change Icon Size
Android application icon size is simply too big? possible with the tips found below HOX you can change the icon size in android applications into smaller or bigger.
To change the size of icons on the home Lcd HTC X you will need an app called Go Launcher EX, install it first on your HTC X and follow the following steps
Tap on the options menu select "preferences". Go to the "visual settings" and press again on the menu "Icons" in the visual settings menu. you will find a new menu "icon size" of the launcher.
Select the size and customize the app icon and set the size to suit your wishes, now just open your android home Lcd and icon size has been changed to a larger or smaller according setting that had been done.
Read More..
To change the size of icons on the home Lcd HTC X you will need an app called Go Launcher EX, install it first on your HTC X and follow the following steps
Tap on the options menu select "preferences". Go to the "visual settings" and press again on the menu "Icons" in the visual settings menu. you will find a new menu "icon size" of the launcher.
Select the size and customize the app icon and set the size to suit your wishes, now just open your android home Lcd and icon size has been changed to a larger or smaller according setting that had been done.
Tuesday, November 18, 2014
Nokia 1280 Mic Not Working Jumper Ways Solution

Nokia 1280 Mic Not Working Jumper Ways Solution
Nokia 1280 Mic Not Working Jumper Ways Problem
Nokia 1280 Mic Not Working Problem Repair By Jumpering


Nokia X3 Display Light Jumper Way Solution Tested

Nokia X3 Display Light Jumper Way Solution Tested
Nokia 3110c Camara Opration Fail 100 Solution

Nokia 3110c Camara Opration Fail 100 Solution
Monday, November 17, 2014
To Install I9060ZSUANB2 Android 4 2 2 Jelly Bean Firmware
How to Install Android 4.2.2 Jelly Bean Official Firmware on Galaxy Grand Lite I9060 through Odin:
Read More..
- Download Android 4.2.2 ZSUANB2 Firmware for Galaxy Grand Lite I9060 from the above list
- Download Odin 3.09
- Switch off your phone and boot Galaxy Grand Lite I9060 into Download Mode by pressing and holding the Volume Down+Home+Power buttons (long press until the boot Lcd appear), now press Volume Up key to proceed to Download Mode.
- Extract the downloaded Odin3.09 zip file and run the Odin3 v3.09.exe file as an administrator (Right click on the .exe file and click on Run as administrator)
- Now connect your Galaxy Grand Lite I9060 to your computer via USB cable
- In Odin3 Lcd, you should see a COM Port number like “0:[COM7]” at ID:COM section and “Added!” text at the message box. This means your device has been detected by Odin3.
- Make sure that, only the “Auto Reboot” and “F. Reset Time” options are checked.
- Now, extract the downloaded firmware zip file, you’ll find a firmware file with extension .tar.md5
- In Odin Lcd, click on AP button and select the firmware file with .tar.md5 extension (The firmware file look something like: I9060XXDLJ5_I9060ODDDLI7_INU.tar.md5)
- Now, click on the Start button to begin the installation process, wait few moments.
- Once completed, you would see “PASS!” message in ID:COM port having green background
- Your phone should automatically reboot after completion
- You can now disconnect your phone from computer
- Finish
A Simple Way To Hard Master Reset Your Motorola Spice XT300

To perform a Master Reset on your Motorola Spice XT300 reset follow the steps below:
- with the phone off, press the power button and the "X" key on the keyboard
- When the triangle appears press the "alt" and the "w" key on the keyboard
- let the Motorola Spice XT300 reboot and your done!
HTC One X How to Backup and Restore Contacts
Your contact in your HTC one x Smartphone is very important, of course you will try to secure it, in case you should backup all contacts on your HTC device to other storage media such as a laptop hard drive or memory card so we have a backup / data backup if there is something that does not want. for this occasion will discuss how to backup and restore contacts in android phone. so, for users of smartphones HTC X please refer to Benefits of backup and restore contacts Backup and restore contacts sometimes needs to be done. there are many benefits to be obtained for example if one day your phone problems then all lost data including contacts. with in the first backup you still have a backup of the data before and when in need to restore / recover data on a backup beforehand. Another example if you want to buy a new phone then contact data on the phone a long time ago and the backup was transferred to a new phone (same phone type conditions).
Pretty easy doing Import / Export contacts this. I hope the information backup and restore contacts in android phone is useful for those who experience kessahan on this subject.
Read More..
Backing up your contacts
- Open the People app.
- On the People tab, tap
 > Manage contacts.
 - Tap Import/Export contacts > Export to phone storage.
- Select an account or type of contacts to export, then tap OK.
Restoring contacts
You can only restore contacts that were backed up using the Export to phone storage feature.
- On the People tab, tap > Manage contacts.
- Tap Import/Export contacts > Import from phone storage.
- If you have more than one account set up, tap the type for the imported contacts.
Nokia 1600 1110 Contact service
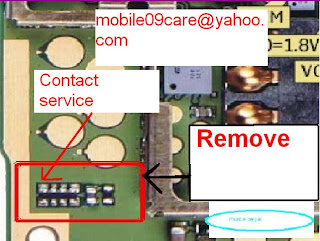
Second solution just full flash with jaf use easy cable latest or lower version flash mobile write good pm then unlock problem solve tested solution

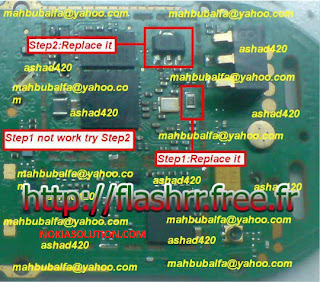
Nokia X6 No LCD backlight LED Dark black LCD screen display solution
Dark black LCD Screen Displays Nokia X6 is caused by the LCDs illuminating backlight LEDs failure to light up on the back of the display Lcd. If this happens you may need to try to replace a new LCD display module replacement on it. If happens that the problem still persists you may then check this corresponding components showed on the solution below.
 The solution above showed the LCD display backlight LED driver circuit of Nokia X6 PCB board.
You need to check, trace, replace particular components highlighted on the solution above and follow some simple procedures indicated.
Nokia X6 LCD Lcd display backlight LED failure solution

You need to check, trace, replace particular components highlighted on the solution above and follow some simple procedures indicated.

Sunday, November 16, 2014

NOKIA C1 00 NOT CHARGING SOLUTION


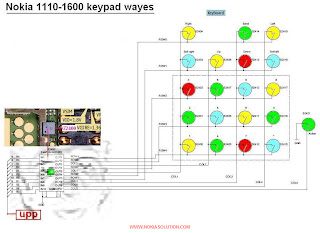
NOKIA 1110 KEYPAD LINE
Nokia 5130 power ON OFF key jumper ways solution
Heres the Nokia 5130 Power ON and OFF key line spot for jumpering solution. This solution can help fix Nokia 5130 Xpressmusic that shows charging indication when the battery charger is plug-in but it does not turns ON when the power key is being pressed.
The Power ON/OFF key is isolated and not connected to other group of key connection for it only holds for switching or powering up the device. There is an open spots near the keypad filter IC that the power ON and OFF key can be connected when the power key fails or or if the line is cut or open.
The solution above shows the spots where you can apply a jumper wire when the power ON OFF key line path of Nokia 5130 is open or cut
Read More..
The Power ON/OFF key is isolated and not connected to other group of key connection for it only holds for switching or powering up the device. There is an open spots near the keypad filter IC that the power ON and OFF key can be connected when the power key fails or or if the line is cut or open.
The solution above shows the spots where you can apply a jumper wire when the power ON OFF key line path of Nokia 5130 is open or cut
Saturday, November 15, 2014

Motorola V3X Mic Solution Jumper Ways

SEARCH TAGS :
Motorola V3X Mic Solution Jumper Ways
Motorola V3X Mic Solution By Jumper
Motorola V3X Mic Solution Jumper
Motorola V3X Mic Problem
Subscribe to:
Posts (Atom)